Electronic Signature Capture Pads (CPIO)
Electronic signature capture pads or cpio device and software allow you to capture digital signatures to your point of sale system. There are few famous vendor of CPIO such as verifone , topaz ,Honeywell , Symbol, ID Tech, etc Each vendor offers different types of devices now its choice of retailer which meets there business requirements.The installation and configuration of these devices are almost same but there are few configuration changes which vary from one device to another. Here i am covering the configuration and installation process for verifone CPIO MX850/MX860/MX870 series which is same.
CPIO Configuration :-
Driver Installation :- very first you need to install the java if it is not on your POS client machine.if it verify the version it should be jre/jdk1.5_xxx or higher.
Verifone MX860/MX850/MX870
- Install USB Driver for your Verifone device.
- Flash ROM, MX OS,
- FormAgent/IBM EFT, and Retailer Screens to upload screen of CPIO .
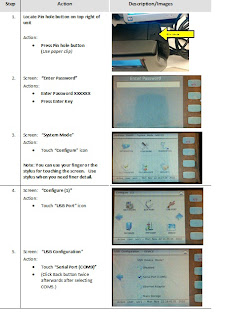
Configure with USB Port :- First verify that USB port is open and have read only access only if not than first do it. After installing driver restart the register or your local machine connect CPIO device, right click on mycomputer than click on device manager it will display list of devices and ports, click on Ports and verify that there should be Mx860 device (COM9).

Now you need to configure this device to Oracle POS Client
ORACLE POS Client File Configurations Changes:-
JRE Related Changes -
Ibmcomm.dllInstructions: Paste file in folder
* (This Jre should be pointed by POS Client if there are more than one jre) Javax.comm.properties
Instructions: Paste file in folder * (This Jre should be pointed by POS Client if there are more than one jre)
Comm.jar
Instructions: Paste file in folder
Directory Location: C:\Program Files\JRE6\lib\ext\
* (This Jre should be pointed by POS Client if there are more than one jre)
Jposdrivers
Instructions: Drop folder and contents into directory structure Folder : jposdrivers or any name* (These drivers entry should be inside Posenv.bat)
Pospal-verifone.jar
Instructions: Paste file in folder if not\360common\lib Posdevices.xmlInstructions: Replace file in folderFile: posdevices.xmlDirectory Location: ..\..\\pos\config\devices\
DeviceContext.xml
Instructions: Replace file in folder
File: DeviceContext.xml
Directory Location: ..\..\\pos\config\context\
Instructions: Replace file in folder
File: DeviceContext.xml
Directory Location: ..\..\
Posenv.bat
Instructions: Modify existing file
File: posenv.bat
Directory Location: ..\..\pos\bin\
Instructions: Modify existing file
File: posenv.bat
Directory Location: ..\..
jpos.xml
Instructions: Replace existing file
File: jpos.xml
Directory Location: ..\..
Add the following to the Posenv.bat file inside ../../Client/pos/bin folder
#Set CPIO Related jars and Classes
:::::::::::::::::::::::::::::::::::::::::::::::::::::::::
call C:\jposdrivers\jposenv.bat
SET CLASSPATH=%CLASSPATH%;%_360COMMON_PATH%\lib\pospal-verifone.jar;
Now test your CPIO configuration by launching ORPOS Client. :) :)
Add the following to the Posenv.bat file inside ../../Client/pos/bin folder
#Set CPIO Related jars and Classes
:::::::::::::::::::::::::::::::::::::::::::::::::::::::::
call C:\jposdrivers\jposenv.bat
SET CLASSPATH=%CLASSPATH%;%_360COMMON_PATH%\lib\pospal-common.jar;SET CLASSPATH=%CLASSPATH%;%_360COMMON_PATH%\lib\pospal-verifone.jar;
Now test your CPIO configuration by launching ORPOS Client. :) :)


