Total Pageviews

Wednesday, November 2, 2011

How-To Connect SquirreL to the Store and Corporate Databases


Squirrel Overview


If it becomes necessary to connect directly to the store or corporate databases, SQuirreL is considered one of the best clients to use.
SQuirreL SQL Client is a graphical Java program that will allow you to view the structure of a JDBC compliant database, browse the data in tables, issue SQL commands etc, see Getting Started and Introduction. The minimum version of Java supported is 1.6.x as of SQuirreL version 3.0. See the Old Versions page for versions of SQuirreL that will work with older versions of Java.

Assumptions

Windows XP
Java 1.6.x is installed
JAVA_HOME points to the Java 1.6.x installation


Required Software

SQuirreL
Oracle Thin JDBC driver (ojdbc6.jar)


Solution

Install SQuirreL
java -jar squirrel-sql--install.jar
Add the Oracle Driver
Click the ‘Drivers’ tab
Scroll down to ‘Oracle Thin Driver’
‘Drivers | Modify Driver…’
Click the ‘Extra Class Path’ tab
Click the ‘Add’ button
Navigate to ojdbc6.jar and click ‘Open’
Click ‘OK’
Create a New Alias for the Store Database
‘Aliases | New Alias…’
Set ‘Name’ to:
Store Database
Select ‘Oracle Thin Driver’ from the Driver drop-down list
Edit the URL to:
jdbc:oracle:thin:@orstores:1521:oretail
Set ‘User Name’ to:
bo
Set ‘Password’ to:
bo
Check the ‘Auto logon’ box
Click the ‘Test’ button
If successful, click the ‘OK’ button
Click the ‘OK’ button
Create a New Alias for the Store Database
‘Aliases | New Alias…’
Set ‘Name’ to:
Corporate Database
Select ‘Oracle Thin Driver’ from the Driver drop-down list
Edit the URL to:
jdbc:oracle:thin:@orstores:1521:oretail
Set ‘User Name’ to:
co
Set ‘Password’ to:
co
Check the ‘Auto logon’ box
Click the ‘Test’ button
If successful, click the ‘OK’ button
Click the ‘OK’ button
Connect to the Database :-
Select one of the aliases
‘Aliases | Connect’


How to connect with Offline DB..


For detail ...


Wednesday, October 5, 2011

CPIO (Sigcap) Device configuration with ORPOS Client

Electronic Signature Capture Pads (CPIO)

Electronic signature capture pads or cpio device and software allow you to capture digital signatures to your point of sale system.  There are few famous vendor of CPIO such as verifone , topaz ,Honeywell , Symbol, ID Tech, etc Each vendor offers different types of devices now its choice of retailer which meets there business requirements.

The installation and configuration of these devices are almost same but there are few configuration changes which vary from one device to another. Here i am covering the configuration and installation process for verifone CPIO MX850/MX860/MX870 series which is same.

CPIO Configuration :-

Driver Installation :- very first you need to install the java if it is not on your POS client machine.if it verify the version it should be jre/jdk1.5_xxx or higher.

Verifone MX860/MX850/MX870


  • Install USB Driver for your Verifone device.
  • Flash ROM, MX OS,
  • FormAgent/IBM EFT, and Retailer Screens to upload screen of CPIO .

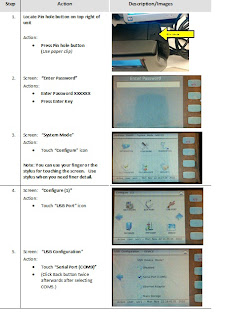
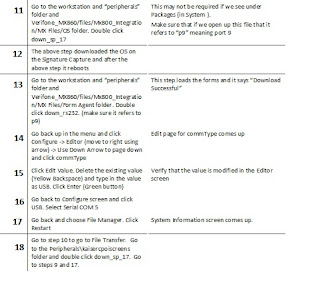
Configure with USB Port :- First verify that USB port is open and have read only access only if not than first do it. After installing driver restart the register or your local machine connect CPIO device, right click on mycomputer than click on device manager it will display list of devices and ports, click on Ports and verify that there should be Mx860 device (COM9).


Now you need to configure this device to Oracle POS Client

ORACLE POS Client File Configurations Changes:-

JRE Related Changes -

Ibmcomm.dll

Instructions:              Paste file in folder                                                                                                 File:                            ibmcomm.dll                                                                                                           Directory Location:   C:\Program Files\JRE6\bin\ 

(This Jre should be pointed by POS Client if there are more than one jre)
 
Javax.comm.properties

 Instructions:              Paste file in folder
 File:                            javax.comm.properties 
Directory Location:   C:\Program Files\JRE6\lib\
 * (This Jre should be pointed by POS Client if there are more than one jre)

Comm.jar

Instructions:              Paste file in folder                                                                                               File:                            comm.jar

Directory Location:   C:\Program Files\JRE6\lib\ext\

* (This Jre should be pointed by POS Client if there are more than one jre)

Jposdrivers

Instructions:              Drop folder and contents into directory structure 
Folder             :           jposdrivers or any name
Directory Location:   C:\Program Files\ or any user define location
* (These drivers entry should be inside Posenv.bat)
 

Pospal-verifone.jar

Instructions:              Paste file in folder if not
File:                            Pospal-verifone.jar
Directory Location:   ..\..\\360common\lib
Posdevices.xml
Instructions:              Replace file in folder
File:                            posdevices.xml
Directory Location:  ..\..\\pos\config\devices\

DeviceContext.xml
Instructions:              Replace file in folder
File:                            DeviceContext.xml
Directory Location:   ..\..\\pos\config\context\

Posenv.bat
Instructions:              Modify existing file
File:                            posenv.bat
Directory Location:   ..\..\pos\bin\

jpos.xml

Instructions:              Replace existing file
File:                             jpos.xml
Directory Location: ..\..\pos\bin\


Add the following to the Posenv.bat file inside ../../Client/pos/bin folder

#Set CPIO Related jars and Classes

:::::::::::::::::::::::::::::::::::::::::::::::::::::::::

call C:\jposdrivers\jposenv.bat
SET CLASSPATH=%CLASSPATH%;%_360COMMON_PATH%\lib\pospal-common.jar;
SET CLASSPATH=%CLASSPATH%;%_360COMMON_PATH%\lib\pospal-verifone.jar;

Now test your CPIO configuration by launching ORPOS Client. :) :)


Monday, October 3, 2011

How to Prevent Putty Session being inactive...................

I am frequent user of putty many time when i left my desk for couples of minutes or more than 15 min sometimes there is  Putty (inactive) problem occurs, i lost control the server which i was accessing from putty. When i went to depth of this problem i found it happens because servers are usually configured to disconnect idle sessions after they are inactive for a particular time. This has many disadvantages. You can no longer monitor the jobs running in the background and the UP arrow for previous commands may not work. And you have to enter the username and password again after restarting the session.

This is how you keep it alive for longer periods
  • open putty , Right click on Putty title bar, then click onchange setting option.

  • Before saving a session, click on Connection in the left pane.

  • Enter a number, in place of zero, in the text box. as i changed from 0 to 30. Save this by pressing apply button.
  • Now go back and save your session so that this setting will be same for future .

This way, the session sends a keep-alive request to the server every 30 seconds. Hence, it stays active.

Wednesday, September 28, 2011

How to take Java Thread Dump?

A java thread dump is a way of finding out what each thread in the JVM is doing at a particular point of time. This is especially useful when your java application seems to hang when running under load. Thread dump will help you to find out where the threads are stuck.

How to take thread dump on UNIX:
First, find the process id by looking in the process table. You can generally get the process numbers of all running Java processes with the command:
ps axf | grep java
or
ps -ef | grep java | grep -v grep

Run the following command to take the thread dump.
Kill –QUIT process_id

The thread dump will be sent to where ever the standard output is redirected to. (In tomcat, normally the thread dump will be sent to TOMCAT_HOME/logs/Catalina.out)
QUIT signal does not actually kill the java process. The thread dump will be sent to the standard output and the process will continue.

How to take thread dump on Windows:
press CTRL+Break
The thread dump is printed in the command window, and you must mark and cut / paste to a separate file in order to continue working on it.


What happens when you take thread dump?
i). The Java process is paused — all threads simply stop dead in their tracks
ii)). The Main java process asks each thread in turn to give a complete account of what they’re doing
iii). The thread dump is sent to standard error, or somewhere else, depending on your Java vendor
iv)-. The Java process is unpaused — all threads simply continue where they left off.
v)-The Java process usually keeps on running, and the whole process only takes a few seconds. Any activity, even input/output is suspended. After the thread dump has completed, everything returns back to normal, just as if nothing had happened.


A sample thread dump is given below.

Monday, September 12, 2011

Windows COM Ports equivalent in Linux (Suppose if ORPOS client will run on Linux)

I shall list the Linux equivalent of the Windows COM ports. This information is asked during the configuration or installation of various softwares, so its best if you make a list of of 'Which Hardware - Which Port' for your machine, so that in future you can refer to it whenever required.

My System Setup : 
The table shows the setup one of my machine.

Remember that the translation of the Com Ports -> Linux files is the same everywhere, but your particular hardware may not be on the same Windows Com Port as this machine. What I mean is, Com 1 in Windows is /dev/ttyS0 in Linux everywhere. But the mouse need not necessarily be present on Com 1. The mouse might be present on some other Com Port. You should know which hardware is on which Windows Com Port on your machine.

My DevicesWindows Com PortLinux equivalent
MouseCOM 1/dev/ttyS0
External ModemCOM 2/dev/ttyS1
Floppy DriveNormal Floppy cable/dev/fd0
PrinterLpt Port/dev/lp0
CDROM DriveIDE cable/dev/cdrom


Saturday, August 27, 2011

FTP Server Configuration on Linux (Redhat/SUSE)

This tutorial will help you while configuring ftp server on linux box. Follow the steps below given.
Server Side Configuration.
Step 1:install ftp package if not installed
#yum install vsftpd                                                                                                                 
 or rpm -ivh vsftpd.....

 Step 2:restart the ftp service
#chkconfig vsftpd on
#service vsftpd restart


Step 3: Modify vsftpd according to your use for user login and other access privileges
vi /etc/vsftpd/vsftpd.conf
userlist_enable=YES
Step 4: add the user entry in user_list file
#vim /etc/vsftpd/user_list
kapil

Your local ftp server will installed on your Linux and will be accessible through LAN.
Configuration may very from one linux to other linux.

Friday, August 26, 2011

SSH (Remote machine login) without password

This tutorial will help you how to SSH to a remote machine without typing your password. You can use this technique if you find yourself logging in to the same machine frequently and find typing your password tedious. It is also useful in scenarios when you have a script which needs to pull some files from a remote machine or perform a task on a remote machine via SSH, and you want to run this script automatically without having a human to type a password.
These instructions work on Linux and Mac. You can achieve the same result on Windows using Putty.(Not tested)

Step 1: On local machine: Generate Authentication Keys

Authentication keys are a pair of private and public keys. The public key is like your login. Unlike a conventional login name, the public key is 2-3 lines long and looks like garbage or claptrap. Don’t worry, you never have to type it manually. Your private key is like your password, but much longer that a regular password. You can generate your public and private keys by typing the following command:

test@suse123> ssh-keygen -t rsa 

Generating public/private rsa key pair.
Enter file in which to save the key (/home/test/kapil/.ssh/id_rsa):
 
Accept the default choice. Hit enter.Hit enter twice.
Enter passphrase (empty for no passphrase):
Enter same passphrase again:

A passphrase encrypts your private key so that no one can see it. However, you should NOT encrypt your private key if you want a password-less login.

The key fingerprint is:
5e:26:54:34:a1:28:18:68:11:11:7d:8d:c6:d5:4b:bf kapil@infogain.com
 

What happened after running the command?

On your local server you just created 2 files in your ~/.ssh directory.

  • cd ~/.ssh  
  • ls -l

-rw------- 1 kapil test 1675 2011-08-17 17:27 id_rsa
-rw-r--r-- 1 kapil test  411 2011-08-17 17:27 id_rsa.pub
id_rsa contains your private key. 
id_rsa.pub contains your public key. 


Step 2 : On remote machine: authorize password less login

Login to remote machine 

ssh hostname -l username

The authenticity of host 'infogain.com (XXX.XXX.XXX.XX)' can't
be established.RSA key fingerprint is 
44.2b:93:ce:1b:1b:99:3a:6d:91:d1:50:aa:0d:87:40.
Are you sure you want to continue connecting (yes/no)? yes (yes and hit enter)
 
Warning: Permanently added 'infogain.com ,XXX.XXX.XXX.XX' (RSA) to the 
list of known hosts.
username@infogain.com's password: Enter your password, and hit enter.

Create a .ssh directory on the remote machine and create a authorized_keys
 file in that directory. You need to copy the entire contents of your 
local machine’s ‘id_rsa.pub’ and paste it in the .authorized_keys file 
on the remote server. 
  • mkdir -p .ssh  
  • chmod 700 .ssh  
  • cd .ssh  
  • touch authorized_keys (Not necessary for use to modify timestamp)
  • chmod 600 authorized_keys  
  • vi authorized_keys  
  • # Do not forget to copy-paste the entire contents of your local machine's ~/.ssh/id_rsa.pub file in authorized_keys  
  • # logout  
  • exit 

Note **: Make sure you have the right permissions for .ssh directory and authorized_keys file, as shown in chmod command above otherwise SSH will not honor your authorized_keys.

 Now you should be able to login to the remote server without typing your password.Type the below command from your local machine.

 ssh hostname -l username  

SSH should log you in without password! Now, you can also scp without having to enter your password.


Thanks - Kapil Pant


Thursday, July 21, 2011

SVN Installation and configuration on LINUX


Configuring Subversion on Linux

Subversion is an open source revision control software that is widely used by many Open Source projects such as Apache and GCC which is designed to be a modern replacement of CVS. This tutorial describes how to setup a SVN repository in a Linux/Unix machine, how to checkout/import modules, update/commit changes to the repository under Windows/Linux.

Subversion started as a project to implement features missing in CVS. Some of these features are:
1-Subversion tracks structure of folders. CVS doesn't have the concept of folders.
2-Subversion has a global revision number for the whole repository. CVS tracks each file individually
3-In Subversion, the commit will have one revision number instead of separate revision numbers for every changed file in CVS.
4-Subversion retains the revision history of moved or copied files.

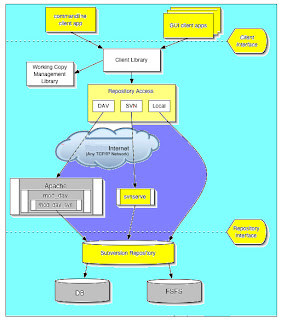
Subversion's Architecture


On one end is a Subversion repository that holds all of your versioned data. On the other
end is your Subversion client program, which manages local reflections of portions of that
versioned data (called “working copies”). Between these extremes are multiple routes
through various Repository Access (RA) layers. Some of these routes go across computer
networks and through network servers which then access the repository. Others bypass
the network altogether and access the repository directly.

 Installation
 Subversion is built on a portability layer called APR—the Apache Portable Runtime library.
The APR library provides all the interfaces that Subversion needs to function on different
operating systems: disk access, network access, memory management, and so on. While
Subversion is able to use Apache as one of its network server programs, its dependence
on APR does not mean that Apache is a required component. APR is a standalone library
usable by any application. It does mean, however, that like Apache, Subversion clients and
servers run on any operating system that the Apache httpd server runs on: Windows,
Linux, all flavors of BSD, Mac OS X, NetWare, and others.

The first step for using Subversion is installing it. This depends on your system

In Ubuntu and Debian, it a matter of running the following command:
$ sudo apt-get install subversion

Creating the Repository
Subversion stores all versioned data in a central repository. To begin, create a new repository. The first Subversion tool we will use is svnadmin. This tool is for administration tasks, like creating repositories, making backup dumps, and the like. To create a repository, open the command line, change the current directory to where you want to create it, and run svnadmin:
$ cd /home/test/kapil
$ svnadmin create /home/test/kapil/svn/repos
 
 
This command creates a new directory, /home/test/kapil/svn/repos
, which contains a Subversion.  
(I created my repository under my home directory: /home/test/…)
I called my repository repos. You can call it whatever you like. Subversion uses this directory to store information about your projects, like file revisions. You won't need to directly deal with this directory, so I suggest keeping it in a safe place and not messing with its contents unless you know what you're doing.

Importing Projects

Now that we have a repository, we will use the svn tool to import and manage projects. To import a project, first create a directory for it in your repository. To do so run svn mkdir:
$ svn mkdir file:///home/test/kapil/svn/repos/testproject
 
Subversion will open your default text editor and ask you to enter a log message.
 Enter an explanation of what you're doing, save, and exit the editor.
It's time to import project files. Change the current directory to the 
project's directory, and run svn import:
 
$ cd /home/test/[...]/testproject 
$ svn import file:///home/test/kapil/svn/repos/testproject
 
This will import all files under /home/test/[...]/testproject to the 
newly-created testproject directory in your repository
 
[…] indicate the directory structure to reach till testproject.
 
Another way to do import

$ svnadmin create /home/test/kapil/svn/repos
$ svn import myproject file:///home/test/kapil/svn/repos/newproject \
-m "Initial import"
Adding mytree/a.c
Adding mytree/b.xml
Adding mytree/subdir
Adding mytree/subdir/test.sh
 
Committed revision 1.
 
The previous example copied the contents of directory myproject under the directory repos/
newproject in the repository:
 

Listing Svn Project

$ svn list file:///var/svn/newrepos/ repos/newproject
a.c
b.xml
subdir/
After the import is finished, the original tree is not converted into a working copy.
To start working, you still need to svn checkout a fresh working copy of the tree.

Check out, Modify, Commit

 
As expert said, the repository is stored in the /svn/repos directory which you
 won't deal with. To work on your files, first you need to check a working copy 
out of the repository. To do so, use svn checkout:
 
$ svn checkout file:///home/test/kapil/svn/repos
 
A new directory named testproject will be created containing your project files
 in current directory. You can work and modify them. Once you're done and you want to 
store the new revision in your repository, run svn commit in the checked-out testproject 
directory:
 
 
$ svn commit
 
Subversion will open your default editor asking for a log message. Again, enter an
 explanation, save, and exit.

Working with Revisions (Basic Work Cycle)

The typical work cycle looks like this:

1. Update your working copy.
svn update

2. Make changes.
svn add                $ svn add <filename>
svn delete    $ svn delete <filename>        
svn copy               $ svn copy <filename>
svn move             $ svn move <filenameto> <filenamewith>

3. Examine your changes.
svn status            $ svn status -v
svn diff                $ svn diff

4. Possibly undo some changes.
svn revert             $ svn revert <filename>
 Revert to previous number   $ svn update -r R (R=revision number)


5. Resolve conflicts (merge others' changes).
svn update           $ svn update
svn resolve

6. Commit your changes.
• svn commit

7 . Incase you need help
svn help import (*)

Tuesday, July 19, 2011

Findstr Command Not Found

Problem:

You see the below exception when you run any batch file in command prompt

'findstr' is not recognized as an internal or external command, operable program or batch file. 

Solution:
'findstr' must be on the PATH. It's under windows\system32 on my window xp box.

You need to set path variable in environment variable. verify the path of windows\system32 in path variable.


Thursday, July 14, 2011

ORPOS Integration Point With Other System

Interfaces Descriptions


The following interface descriptions are relative to Oracle Retail Strategic Store Solutions (ORSS), suite of applications where import implies that the ORSS application is importing the data originating from an external system and export means that the ORSS application is exporting the data to be consumed by an external system.


 1)- Tax Import 

This interface is used for distributing Tax data in Central Office and the stores. This data is provided by any third party application like Vertex.Tax Geocodes for stores or TaxGroup IDs for items needs to provided by third-party tax application system. It is the responsibility of the implementation team to intercept the following download data and use a third-party tax application to apply the appropriate tax information:


2)- Store Hierarchy Import

This interface is used for distributing Store Hierarchy data originating from any master system to Central Office and the stores.Retail store is organized into departments offering a variety of merchandise; commonly part of a retail chain.

This interface is used for distributing Merchandise Hierarchy data originating from any master system to Central Office and to the stores. This interface would be used to maintain the Merchandise Hierarchy for items in the store.The merchandise hierarchy allows you to create the relationships necessary to support
the product management structure of your company. You can assign a buyer and merchandiser at the division, group, and department levels of the merchandise hierarchy.

This interface is used for distributing item data originating from any master system to Central Office and the stores. This interface will be used to maintain the store item database.
 
This interface is used for distributing price changes originating from any master system or dedicated Pricing module or system such as ORPM to Central Office and the stores. This interface would be used to maintain the price and promotion for items in the store.

This interface is used for distributing Employee data originating from OIM/LDAP to Central Office and the 
stores.

This interface is used for distributing Customer data originating from dedicated customer management system or customer loyalty management system to Central Office and the stores.  

8)-LDAP
This interface is used to authenticate users/employee login credentials against the enterprise LDAP server.
Its mandatory one Service user has been configured in LDAP.
9)-Transaction Posting
This interface is used to purge transaction data and customer data from store database to corporate database with in certain time frame or some third party such as loyalty management system.The purge period may vary.

10)- Order Management System
This interface is used for online ordering as well as offline ordering such as an order in advance by customer when he/she found an item out of stock in store and he/she needed that item ASAP.

11/12)-Missing Item look-up /Customer look-up

13)-ISD
This interface is used for Tender Authorization system.  such as bank gateway , payment switch etc.

14)-ISD to Master System Integration if required

15)- Other System
This interface is used to integrate ORPOS system to legacy system.


Configure ORBO compatible for Purple Stack

Till version 13.2   Oracle provide default configuration in installer for two stacks named as Red stack (OAS and OracleDB) Blue Stack (IBM WAS and DB2).
There was a demand from the customer to use Oracle as database and WAS as application server, they named this configuration as PURPLE stack.Now first question comes in  mind how to make installer compatible to purple stack.
If you are inexperience its looks like tricky but if you think little bit deeper you will find the solution easily. Only thing which you need to kept in mind that only there is changes in DB related activity , for WAS everything is pre configured by Oracle you need to change Oracle DB related driver few configuration files and may be need to modify ant script.


Solution Of Problem

1)- Modify antinstall-config file under <!--WAS PANEL--> as shown below
<!-- OAS PANEL -->
    <page ifProperty="${env.APPSERVER}=oracle" type="input" name="DataSourceDetails" displayText="Data Source User">
        <comment displayText="Provide the details for the Back Office schema user" />
        <comment displayText=" " />
        <text property="input.datasource.url" defaultValue="jdbc:oracle:thin:@[host]:[tcpPort]:[dbname]"
              displayText="JDBC URL" />
        <text property="input.datasource.username" defaultValue="" displayText="Data Source Username" />
        <password property="input.datasource.password" defaultValue="" displayText="Data Source password"
              regex=".*" />
        <hidden property="input.oc4j.type" value="enterprise" />
    </page>

    <!-- WAS PANEL -->

    <page ifProperty="${env.APPSERVER}=websphere" type="input" name="DataSourceDetails" displayText="Data Source User">
        <comment displayText="Provide the details for the Back Office schema user" />
        <comment displayText=" " />
        <text property="input.datasource.url" defaultValue="jdbc:oracle:thin:@[host]:[tcpPort]:[dbname]"
              displayText="JDBC URL" />
        <text property="input.datasource.username" defaultValue="" displayText="Data Source Username" />
        <password property="input.datasource.password" defaultValue="" displayText="Data Source Password"
              regex=".*" />
    </page>

2)-Modify build.xml file under target "was-deploy-database"

<target name="was-deploy-database">
    <!-- testing db connection -->
    <property file="${db.dir}/db.properties"/>
    <echo>Testing the Database connection.  A failure here indicates an issue communicating with the Database.</echo>
    <sql driver="${db.jdbc-driver}"
        url="${datasource.url.trimmed}"
    userid="${datasource.username.trimmed}"
    password="${datasource.password.trimmed}"
    onerror="stop">
             <classpath>
                 <pathelement location="${db.dir}/lib/${db.jdbc-jar}"/>
                 <pathelement location="${db.dir}/lib/${db.jdbc-jar2}"/>
                 <pathelement location="${db.dir}/lib/${db.jdbc-jar3}"/>
             </classpath>
        select table_name from user_tables;
         <!--select * from sysstat.TABLES;-->
    </sql>
    <if>
        <istrue value="${install.database.trimmed}"/>
    <then>
        <ant dir="${db.dir}" antfile="${db.dir}/build.xml" target="load_sql"/>
        </then>
    </if>
</target>

3)-Modify was.properties file for JDBC/Datasource configuration
#
# These settings are for the JDBC/Datasource configuration
#
data.source=jdbc/DataSource
db.user=@installer.db.user@
db.password-encrypted=@installer.db.password.encrypted@
db.jdbc-url=@installer.db.jdbc.url@
#db.jdbc-url=jdbc:oracle:thin:@eqa2:1521:co01
#db.jdbc-driver=com.ibm.db2.jcc.DB2Driver

db.jdbc-driver=oracle.jdbc.driver.OracleDriver
jars.dir=@installer.db.tmp.dir@
db.ssl.enabled=@enable.secure.jdbc@
#db.ssl.port=@datasource.port.secure@

# DB install path is the path to the list of db.jars
# Obviously, this assumes the jars listed (comma separated) in db.jars are in the same directory
db.install.path=${was.libs}
#db.jars=db2jcc.jar,db2jcc_license_cu.jar
db.jars=ojdbc14.jar (include oracle driver)

Save these files inside your Installer. Now your ORBO installer is ready to use  for purple stack.