Total Pageviews

Thursday, July 21, 2011

SVN Installation and configuration on LINUX


Configuring Subversion on Linux

Subversion is an open source revision control software that is widely used by many Open Source projects such as Apache and GCC which is designed to be a modern replacement of CVS. This tutorial describes how to setup a SVN repository in a Linux/Unix machine, how to checkout/import modules, update/commit changes to the repository under Windows/Linux.

Subversion started as a project to implement features missing in CVS. Some of these features are:
1-Subversion tracks structure of folders. CVS doesn't have the concept of folders.
2-Subversion has a global revision number for the whole repository. CVS tracks each file individually
3-In Subversion, the commit will have one revision number instead of separate revision numbers for every changed file in CVS.
4-Subversion retains the revision history of moved or copied files.

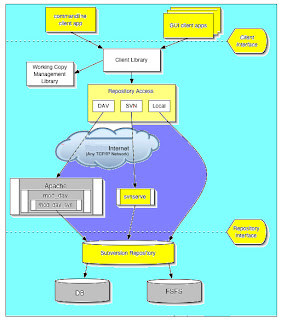
Subversion's Architecture


On one end is a Subversion repository that holds all of your versioned data. On the other
end is your Subversion client program, which manages local reflections of portions of that
versioned data (called “working copies”). Between these extremes are multiple routes
through various Repository Access (RA) layers. Some of these routes go across computer
networks and through network servers which then access the repository. Others bypass
the network altogether and access the repository directly.

 Installation
 Subversion is built on a portability layer called APR—the Apache Portable Runtime library.
The APR library provides all the interfaces that Subversion needs to function on different
operating systems: disk access, network access, memory management, and so on. While
Subversion is able to use Apache as one of its network server programs, its dependence
on APR does not mean that Apache is a required component. APR is a standalone library
usable by any application. It does mean, however, that like Apache, Subversion clients and
servers run on any operating system that the Apache httpd server runs on: Windows,
Linux, all flavors of BSD, Mac OS X, NetWare, and others.

The first step for using Subversion is installing it. This depends on your system

In Ubuntu and Debian, it a matter of running the following command:
$ sudo apt-get install subversion

Creating the Repository
Subversion stores all versioned data in a central repository. To begin, create a new repository. The first Subversion tool we will use is svnadmin. This tool is for administration tasks, like creating repositories, making backup dumps, and the like. To create a repository, open the command line, change the current directory to where you want to create it, and run svnadmin:
$ cd /home/test/kapil
$ svnadmin create /home/test/kapil/svn/repos
 
 
This command creates a new directory, /home/test/kapil/svn/repos
, which contains a Subversion.  
(I created my repository under my home directory: /home/test/…)
I called my repository repos. You can call it whatever you like. Subversion uses this directory to store information about your projects, like file revisions. You won't need to directly deal with this directory, so I suggest keeping it in a safe place and not messing with its contents unless you know what you're doing.

Importing Projects

Now that we have a repository, we will use the svn tool to import and manage projects. To import a project, first create a directory for it in your repository. To do so run svn mkdir:
$ svn mkdir file:///home/test/kapil/svn/repos/testproject
 
Subversion will open your default text editor and ask you to enter a log message.
 Enter an explanation of what you're doing, save, and exit the editor.
It's time to import project files. Change the current directory to the 
project's directory, and run svn import:
 
$ cd /home/test/[...]/testproject 
$ svn import file:///home/test/kapil/svn/repos/testproject
 
This will import all files under /home/test/[...]/testproject to the 
newly-created testproject directory in your repository
 
[…] indicate the directory structure to reach till testproject.
 
Another way to do import

$ svnadmin create /home/test/kapil/svn/repos
$ svn import myproject file:///home/test/kapil/svn/repos/newproject \
-m "Initial import"
Adding mytree/a.c
Adding mytree/b.xml
Adding mytree/subdir
Adding mytree/subdir/test.sh
 
Committed revision 1.
 
The previous example copied the contents of directory myproject under the directory repos/
newproject in the repository:
 

Listing Svn Project

$ svn list file:///var/svn/newrepos/ repos/newproject
a.c
b.xml
subdir/
After the import is finished, the original tree is not converted into a working copy.
To start working, you still need to svn checkout a fresh working copy of the tree.

Check out, Modify, Commit

 
As expert said, the repository is stored in the /svn/repos directory which you
 won't deal with. To work on your files, first you need to check a working copy 
out of the repository. To do so, use svn checkout:
 
$ svn checkout file:///home/test/kapil/svn/repos
 
A new directory named testproject will be created containing your project files
 in current directory. You can work and modify them. Once you're done and you want to 
store the new revision in your repository, run svn commit in the checked-out testproject 
directory:
 
 
$ svn commit
 
Subversion will open your default editor asking for a log message. Again, enter an
 explanation, save, and exit.

Working with Revisions (Basic Work Cycle)

The typical work cycle looks like this:

1. Update your working copy.
svn update

2. Make changes.
svn add                $ svn add <filename>
svn delete    $ svn delete <filename>        
svn copy               $ svn copy <filename>
svn move             $ svn move <filenameto> <filenamewith>

3. Examine your changes.
svn status            $ svn status -v
svn diff                $ svn diff

4. Possibly undo some changes.
svn revert             $ svn revert <filename>
 Revert to previous number   $ svn update -r R (R=revision number)


5. Resolve conflicts (merge others' changes).
svn update           $ svn update
svn resolve

6. Commit your changes.
• svn commit

7 . Incase you need help
svn help import (*)
Tuesday, July 19, 2011

Findstr Command Not Found

Problem:

You see the below exception when you run any batch file in command prompt

'findstr' is not recognized as an internal or external command, operable program or batch file. 

Solution:
'findstr' must be on the PATH. It's under windows\system32 on my window xp box.

You need to set path variable in environment variable. verify the path of windows\system32 in path variable.


Thursday, July 14, 2011

ORPOS Integration Point With Other System

Interfaces Descriptions


The following interface descriptions are relative to Oracle Retail Strategic Store Solutions (ORSS), suite of applications where import implies that the ORSS application is importing the data originating from an external system and export means that the ORSS application is exporting the data to be consumed by an external system.


 1)- Tax Import 

This interface is used for distributing Tax data in Central Office and the stores. This data is provided by any third party application like Vertex.Tax Geocodes for stores or TaxGroup IDs for items needs to provided by third-party tax application system. It is the responsibility of the implementation team to intercept the following download data and use a third-party tax application to apply the appropriate tax information:


2)- Store Hierarchy Import

This interface is used for distributing Store Hierarchy data originating from any master system to Central Office and the stores.Retail store is organized into departments offering a variety of merchandise; commonly part of a retail chain.

This interface is used for distributing Merchandise Hierarchy data originating from any master system to Central Office and to the stores. This interface would be used to maintain the Merchandise Hierarchy for items in the store.The merchandise hierarchy allows you to create the relationships necessary to support
the product management structure of your company. You can assign a buyer and merchandiser at the division, group, and department levels of the merchandise hierarchy.

This interface is used for distributing item data originating from any master system to Central Office and the stores. This interface will be used to maintain the store item database.
 
This interface is used for distributing price changes originating from any master system or dedicated Pricing module or system such as ORPM to Central Office and the stores. This interface would be used to maintain the price and promotion for items in the store.

This interface is used for distributing Employee data originating from OIM/LDAP to Central Office and the 
stores.

This interface is used for distributing Customer data originating from dedicated customer management system or customer loyalty management system to Central Office and the stores.  

8)-LDAP
This interface is used to authenticate users/employee login credentials against the enterprise LDAP server.
Its mandatory one Service user has been configured in LDAP.
9)-Transaction Posting
This interface is used to purge transaction data and customer data from store database to corporate database with in certain time frame or some third party such as loyalty management system.The purge period may vary.

10)- Order Management System
This interface is used for online ordering as well as offline ordering such as an order in advance by customer when he/she found an item out of stock in store and he/she needed that item ASAP.

11/12)-Missing Item look-up /Customer look-up

13)-ISD
This interface is used for Tender Authorization system.  such as bank gateway , payment switch etc.

14)-ISD to Master System Integration if required

15)- Other System
This interface is used to integrate ORPOS system to legacy system.


Configure ORBO compatible for Purple Stack

Till version 13.2   Oracle provide default configuration in installer for two stacks named as Red stack (OAS and OracleDB) Blue Stack (IBM WAS and DB2).
There was a demand from the customer to use Oracle as database and WAS as application server, they named this configuration as PURPLE stack.Now first question comes in  mind how to make installer compatible to purple stack.
If you are inexperience its looks like tricky but if you think little bit deeper you will find the solution easily. Only thing which you need to kept in mind that only there is changes in DB related activity , for WAS everything is pre configured by Oracle you need to change Oracle DB related driver few configuration files and may be need to modify ant script.


Solution Of Problem

1)- Modify antinstall-config file under <!--WAS PANEL--> as shown below
<!-- OAS PANEL -->
    <page ifProperty="${env.APPSERVER}=oracle" type="input" name="DataSourceDetails" displayText="Data Source User">
        <comment displayText="Provide the details for the Back Office schema user" />
        <comment displayText=" " />
        <text property="input.datasource.url" defaultValue="jdbc:oracle:thin:@[host]:[tcpPort]:[dbname]"
              displayText="JDBC URL" />
        <text property="input.datasource.username" defaultValue="" displayText="Data Source Username" />
        <password property="input.datasource.password" defaultValue="" displayText="Data Source password"
              regex=".*" />
        <hidden property="input.oc4j.type" value="enterprise" />
    </page>

    <!-- WAS PANEL -->

    <page ifProperty="${env.APPSERVER}=websphere" type="input" name="DataSourceDetails" displayText="Data Source User">
        <comment displayText="Provide the details for the Back Office schema user" />
        <comment displayText=" " />
        <text property="input.datasource.url" defaultValue="jdbc:oracle:thin:@[host]:[tcpPort]:[dbname]"
              displayText="JDBC URL" />
        <text property="input.datasource.username" defaultValue="" displayText="Data Source Username" />
        <password property="input.datasource.password" defaultValue="" displayText="Data Source Password"
              regex=".*" />
    </page>

2)-Modify build.xml file under target "was-deploy-database"

<target name="was-deploy-database">
    <!-- testing db connection -->
    <property file="${db.dir}/db.properties"/>
    <echo>Testing the Database connection.  A failure here indicates an issue communicating with the Database.</echo>
    <sql driver="${db.jdbc-driver}"
        url="${datasource.url.trimmed}"
    userid="${datasource.username.trimmed}"
    password="${datasource.password.trimmed}"
    onerror="stop">
             <classpath>
                 <pathelement location="${db.dir}/lib/${db.jdbc-jar}"/>
                 <pathelement location="${db.dir}/lib/${db.jdbc-jar2}"/>
                 <pathelement location="${db.dir}/lib/${db.jdbc-jar3}"/>
             </classpath>
        select table_name from user_tables;
         <!--select * from sysstat.TABLES;-->
    </sql>
    <if>
        <istrue value="${install.database.trimmed}"/>
    <then>
        <ant dir="${db.dir}" antfile="${db.dir}/build.xml" target="load_sql"/>
        </then>
    </if>
</target>

3)-Modify was.properties file for JDBC/Datasource configuration
#
# These settings are for the JDBC/Datasource configuration
#
data.source=jdbc/DataSource
db.user=@installer.db.user@
db.password-encrypted=@installer.db.password.encrypted@
db.jdbc-url=@installer.db.jdbc.url@
#db.jdbc-url=jdbc:oracle:thin:@eqa2:1521:co01
#db.jdbc-driver=com.ibm.db2.jcc.DB2Driver

db.jdbc-driver=oracle.jdbc.driver.OracleDriver
jars.dir=@installer.db.tmp.dir@
db.ssl.enabled=@enable.secure.jdbc@
#db.ssl.port=@datasource.port.secure@

# DB install path is the path to the list of db.jars
# Obviously, this assumes the jars listed (comma separated) in db.jars are in the same directory
db.install.path=${was.libs}
#db.jars=db2jcc.jar,db2jcc_license_cu.jar
db.jars=ojdbc14.jar (include oracle driver)

Save these files inside your Installer. Now your ORBO installer is ready to use  for purple stack.