Configuring Subversion on Linux
Subversion is an open source revision control software that is widely used by many Open Source projects such as Apache and GCC which is designed to be a modern replacement of CVS. This tutorial describes how to setup a SVN repository in a Linux/Unix machine, how to checkout/import modules, update/commit changes to the repository under Windows/Linux.
Subversion started as a project to implement features missing in CVS. Some of these features are:
1-Subversion tracks structure of folders. CVS doesn't have the concept of folders.
2-Subversion has a global revision number for the whole repository. CVS tracks each file individually
3-In Subversion, the commit will have one revision number instead of separate revision numbers for every changed file in CVS.
4-Subversion retains the revision history of moved or copied files.
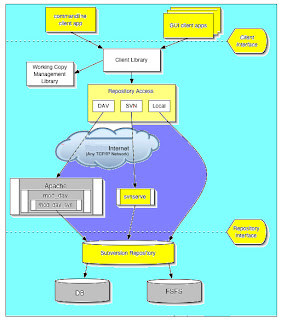
Subversion's Architecture
On one end is a Subversion repository that holds all of your versioned data. On the other
end is your Subversion client program, which manages local reflections of portions of that
versioned data (called “working copies”). Between these extremes are multiple routes
through various Repository Access (RA) layers. Some of these routes go across computer
networks and through network servers which then access the repository. Others bypass
the network altogether and access the repository directly.
Installation
Subversion is built on a portability layer called APR—the Apache Portable Runtime library.
The APR library provides all the interfaces that Subversion needs to function on different
operating systems: disk access, network access, memory management, and so on. While
Subversion is able to use Apache as one of its network server programs, its dependence
on APR does not mean that Apache is a required component. APR is a standalone library
usable by any application. It does mean, however, that like Apache, Subversion clients and
servers run on any operating system that the Apache httpd server runs on: Windows,
Linux, all flavors of BSD, Mac OS X, NetWare, and others.
The first step for using Subversion is installing it. This depends on your system
In Ubuntu and Debian, it a matter of running the following command:
$ sudo apt-get install subversionCreating the Repository
Subversion stores all versioned data in a central repository. To begin, create a new repository. The first Subversion tool we will use is
svnadmin. This tool is for administration tasks, like creating repositories, making backup dumps, and the like. To create a repository, open the command line, change the current directory to where you want to create it, and run svnadmin:$ cd /home/test/kapil$ svnadmin create /home/test/kapil/svn/repos This command creates a new directory, /home/test/kapil/svn/repos
, which contains a Subversion. (I created my repository under my home directory:
/home/test/…)I called my repository repos. You can call it whatever you like. Subversion uses this directory to store information about your projects, like file revisions. You won't need to directly deal with this directory, so I suggest keeping it in a safe place and not messing with its contents unless you know what you're doing.
Importing Projects
Now that we have a repository, we will use the
svn tool to import and manage projects. To import a project, first create a directory for it in your repository. To do so run svn mkdir:$ svn mkdir file:///home/test/kapil/svn/repos/testproject Subversion will open your default text editor and ask you to enter a log message. Enter an explanation of what you're doing, save, and exit the editor.It's time to import project files. Change the current directory to the project's directory, and run svn import: $ cd /home/test/[...]/testproject $ svn import file:///home/test/kapil/svn/repos/testproject This will import all files under /home/test/[...]/testproject to the newly-created testproject directory in your repository […] indicate the directory structure to reach till testproject. Another way to do import$ svnadmin create /home/test/kapil/svn/repos
$ svn import myproject file:///home/test/kapil/svn/repos/newproject \
-m "Initial import"
Adding mytree/a.c
Adding mytree/b.xml
Adding mytree/subdir
Adding mytree/subdir/test.sh
Committed revision 1. The previous example copied the contents of directory myproject under the directory repos/
newproject in the repository: Listing Svn Project
$ svn list file:///var/svn/newrepos/ repos/newproject
a.c
b.xml
subdir/After the import is finished, the original tree is not converted into a working copy.
To start working, you still need to svn checkout a fresh working copy of the tree.Check out, Modify, Commit
As expert said, the repository is stored in the /svn/repos directory which you won't deal with. To work on your files, first you need to check a working copy out of the repository. To do so, use svn checkout: $ svn checkout file:///home/test/kapil/svn/repos A new directory named testproject will be created containing your project files in current directory. You can work and modify them. Once you're done and you want to store the new revision in your repository, run svn commit in the checked-out testproject directory: $ svn commit Subversion will open your default editor asking for a log message. Again, enter an explanation, save, and exit.Working with Revisions (Basic Work Cycle)
The typical work cycle looks like this:
1. Update your working copy.
• svn update
2. Make changes.
• svn add $ svn add <filename>•svn delete $ svn delete <filename> • svn copy $ svn copy <filename>• svn move $ svn move <filenameto> <filenamewith>
3. Examine your changes.
• svn status $ svn status -v
• svn diff $ svn diff
4. Possibly undo some changes.
• svn revert $ svn revert <filename> Revert to previous number $ svn update -r R (R=revision number)5. Resolve conflicts (merge others' changes).
• svn update $ svn update• svn resolve
6. Commit your changes.
• svn commit
7 . Incase you need help
svn help import (*)
No comments:
Post a Comment